
7.3 KiB
Home Assistant Add-on: TeslaMate
A self-hosted data logger for your Tesla 🚘
About
TeslaMate is a powerful, self-hosted data logger for your Tesla.
- Written in Elixir
- Data is stored in a Postgres database
- Visualization and data analysis with Grafana
- Vehicle data is published to a local MQTT Broker
This add-on allows you to run TeslaMate on your Home Assistant server based on the the official TeslaMate docker image.
Configuration
The configuration is self-explanatory, but essentially we need details about accessing the PostgreSQL database, Grafana and optionally MQTT. You will also need to configure TeslaMate (see "TeslaMate Configuration" below) so the links to TeslaMate in the Grafana dashboards work.
Options
Remember to restart the add-on when the configuration is changed.
Database Options
-
database_user: The username used to connect to your PostgreSQL server. -
database_pass: The password for the user to connect to your PostgreSQL server. -
database_port: The port your PostgreSQL server is listening on. Default:5432. -
database_host: The hostname of your PostgreSQL server. -
database_name: The name of the PostgreSQL database. Default:teslamate. -
database_ssl: Use SSL to connect to the database.
MQTT Options (Optional)
If you are going to use MQTT, you must have a username and password defined for your MQTT user; do not use the HA local login (thanks quach128).
You must also specify an access control list entry for the teslamate user, for example:
user teslamate
topic readwrite teslamate/#
See the official docs on how to configure access control with Mosquitto
-
disable_mqtt: Disable MQTT? -
mqtt_host: The hostname of your MQTT server. -
mqtt_user: The username used to connect to your MQTT server. -
mqtt_pass: The password for the user to connect to your PostgreSQL server. -
mqtt_tls: Use TLS to connect to MQTT? -
mqtt_tls_accept_invalid_certs: MQTT TLS Accepts invalid certificates -
mqtt_namespace: MQTT Namespace
Grafana Options
I recommend you use the existing Grafana add-on from the community add-ons, if you do, please enable the following plugins in your yaml configurations, e.g.
plugins:
  - natel-discrete-panel
  - natel-plotly-panel
  - pr0ps-trackmap-panel
  - grafana-piechart-panel
custom_plugins:
  - name: panodata-map-panel
    url: https://github.com/panodata/panodata-map-panel/releases/download/0.16.0/panodata-map-panel-0.16.0.zip
    unsigned: true
custom_plugins: []
env_vars:
  - name: GF_SECURITY_ADMIN_USER
    value: <youruser>
  - name: GF_SECURITY_ADMIN_PASSWORD
    value: <yourpass>
ssl: true                 # optional if you are using TLS
certfile: fullchain.pem    # optional if you are using TLS
keyfile: privkey.pem       # optional if you are using TLS
Note that the security admin password and usernames can only be set on the first start of the Grafana add-on, so if you already have it configured you'll need to use the same details or remove the add-on and re-add it.
-
grafana_import_dashboards: (Optional, but recommended) Automatically import the grafana dashboards on startup? -
grafana_folder_name: Folder within Grafana to store all the dashboards. Default:TeslaMate. -
grafana_host: The hostname of your Grafana server. Default:a0d7b954-grafana. -
grafana_port: The port your Grafana server is listening on. Default:3000. -
grafana_user: The username used to connect to your Grafana server. -
grafana_pass: The password for the user to connect to your Grafana server. -
timezone: Timezone to use for Granafa dashboards.
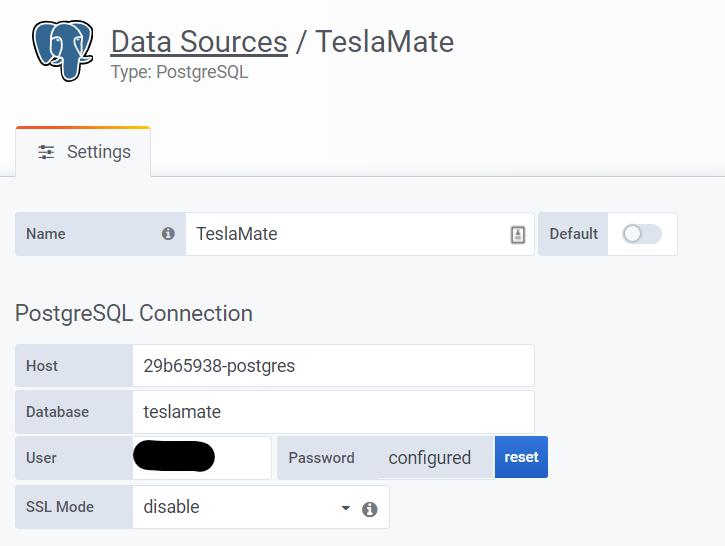
Once you have Grafana up and running, you'll need to configure a data source to read data from the PostgreSQL database:
‼️ Note: The name must be TeslaMate as all the dashboards expect the datasource to use this name.
Other Options
-
default_geofence: (Optional) The default geofence to send viaGEOFENCEif the car is not in a geofence. -
encryption_key: (Optional) A random string used as encrypt and protect the Tesla API keys. This will be auto-generated on first run if not set. -
import_dir: (Optional) The path to the directory where TeslaMate should look for the TeslaMate export CSV file. Default:/share/teslamate. -
env_vars: (Optional) Set additional environment variables for TeslaMate which aren't currently exposed by the configuration options in this add-on.Each entry is made up of a name and value:
name: The case-sensitive environment variable name.value: The value to be set in the environment variable.
Note: These will also overwrite any environment variable set using the configuration options above.
TeslaMate Configuration
In order for the links in the Grafana dashboards and the TeslaMate UI to link to the correct locations, you will also need to configure TeslaMate.
Once you have started the addon, look at the log output for the section which looks like this and take note of the two lines with =>:
[09:26:32] INFO: Configure TeslaMate settings by adding these values
                 to the URL you use to access your Home Assistant instance:

  => Web App: /api/hassio_ingress/ljiIc6sOVGOSQfTRjscvLVJJS5Rxp33gsdEtf9y3oQY
  => Dashboards: /api/hassio_ingress/G9ocwA44wt9Bcba8LvP8tDhlfFiFnnPftOZBwp-Pgzs
From the addon Info tab, click "Open Web UI", enter the Tesla API access and refresh tokens if you haven't already, and then go to TeslaMate's Settings. Scroll to the very bottom and set each of the URLs to the URL you use to access your Home Assistant instance with each of the above appended.
For example, if you access your Home Assistant instance at https://ha.example.com, set each as follows:
- Web App:
https://ha.example.com/api/hassio_ingress/ljiIc6sOVGOSQfTRjscvLVJJS5Rxp33gsdEtf9y3oQY - Dashboards:
https://ha.example.com/api/hassio_ingress/G9ocwA44wt9Bcba8LvP8tDhlfFiFnnPftOZBwp-Pgzs
Do not use these values. Use the values from your log output.
Data Import from TeslaFi
It is now possible to import CSV data from TeslaFi, refer to the official docs.
Follow this process:
-
Copy the CSV data to the
/share/teslamatefolder on your Home Assistant instance. You can do this using the Samba or SSH add-ons. -
Make sure the
import_pathconfiguration setting is set to/share/teslamate. -
Restart the TeslaMate add-on and navigate to the web UI, you should be presented with the import screen.
-
Import the data
-
Once imported sucessfully, delete the CSV files to avoid the import screen being presented.