mirror of
https://github.com/lildude/ha-addon-teslamate.git
synced 2026-10-13 13:10:30 -04:00
 Matt White
fc182d9db2
Matt White
fc182d9db2
* Support IMPORT_DIR with access to /share

* Fix errors setting env vars

* Set MQTT_NAMESPACE to empty string

* Update README for new import functionality

* Update changelog for 0.6.0
101 lines
3.8 KiB
Markdown
101 lines
3.8 KiB
Markdown
# TeslaMate Addon for Home Assistant
|
|
|
|
This addon builds on the excellent work of [Adrian Kumpf](https://github.com/adriankumpf/teslamate). See his repo for information regarding the TeslaMate application.
|
|
|
|
This addon is part of [my Home Assistant addon repo](https://github.com/matt-FFFFFF/hassio-addon-repository) - see link for instructions on how to add to Home Assistant.
|
|
|
|
## Installation
|
|
|
|
1. Add [my repository](https://github.com/matt-FFFFFF/hassio-addon-repository) to Home Assistant. See [installing third party addons](https://www.home-assistant.io/hassio/installing_third_party_addons/) from the Home Assistant documentation.
|
|
2. Add the `TeslaMate` and the `PostgreSQL` addons from my repo and the `Grafana` addon from the community repo.
|
|
3. Before starting Postgres, [configure](https://github.com/matt-FFFFFF/hassio-addon-postgres/blob/main/README.md) the addon by setting the DB name, username and password. Now you can start it up.
|
|
|
|
### DB Connection
|
|
|
|
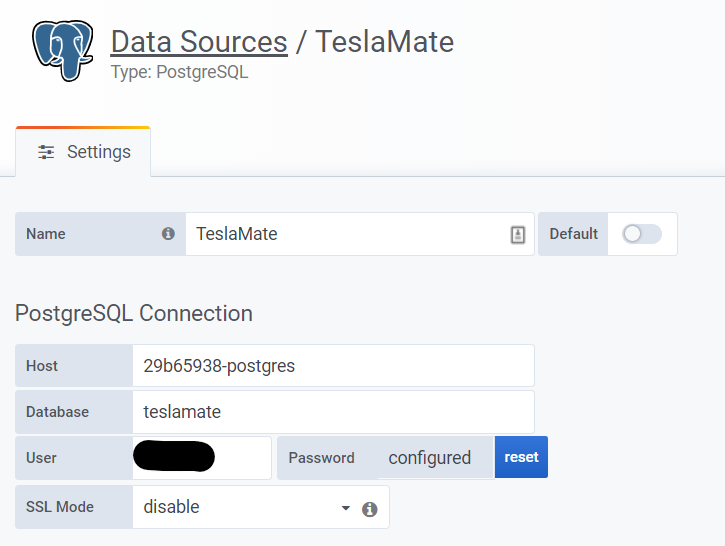
If using the Postgres addon from my addon repo, the database host is `29b65938-postgres`. Below is a snippit from the TeslaMate addon configuration, just replace the DB name, username and password and you will be good to go.
|
|
|
|
```yaml
|
|
database_user: mydbuser
|
|
database_pass: mydbpass
|
|
database_name: mydbname
|
|
database_host: 29b65938-postgres
|
|
database_ssl: false
|
|
database_port: 5432
|
|
```
|
|
|
|
### MQTT Configuration
|
|
|
|
You **must** have a username and password defined for your MQTT user, do not use the HA local login (thanks [quach128](https://github.com/quach128)). Below is a sample configuration using the Mosquitto MQTT addon available in the Home Assistant core addon repo:
|
|
|
|
```yaml
|
|
disable_mqtt: false
|
|
mqtt_host: core-mosquitto
|
|
mqtt_user: mymqttuser
|
|
mqtt_pass: mymqtttpass
|
|
mqtt_tls: false
|
|
mqtt_tls_accept_invalid_certs: true
|
|
```
|
|
|
|
#### Mosquitto access control list
|
|
|
|
You must specify an access control list entry for the teslamate user, for example:
|
|
|
|
```text
|
|
user teslamate
|
|
topic readwrite teslamate/#
|
|
```
|
|
|
|
See the [official docs](https://github.com/home-assistant/addons/blob/master/mosquitto/DOCS.md) on how to configure access control with Mosquitto
|
|
|
|
### Grafana Configuration
|
|
|
|
I recommend you use the existing Grafana addon from the community addons
|
|
|
|
#### Data Source
|
|
|
|
Configure a PostgreSQL data source as follows:
|
|
|
|
|
|
|
|
#### Automatically Uploading Grafana Dashboards
|
|
|
|
Without this step you won't be able to use the TeslaMate dashboards, so this is recommended.
|
|
|
|
Configure the `Grafana` addon and set the admin username and password - we will need this to upload the dashboards:
|
|
|
|
```yaml
|
|
env_vars:
|
|
- name: GF_SECURITY_ADMIN_USER
|
|
value: admin
|
|
- name: GF_SECURITY_ADMIN_PASSWORD
|
|
value: mysecretpassword
|
|
```
|
|
|
|
Now configure the `Teslamate` addon:
|
|
|
|
```yaml
|
|
grafana_import_dashboards: true
|
|
grafana_folder_name: TeslaMate
|
|
grafana_host: a0d7b954-grafana # this is correct if you use the community addon
|
|
grafana_port: 3000 # this is correct if you use the community addon
|
|
grafana_user: admin
|
|
grafana_pass: mysecretpassword
|
|
```
|
|
|
|
## Data Import from TeslaFi
|
|
|
|
It is now possible to import CSV data from TeslaFi, refer to the [official docs](https://docs.teslamate.org/docs/import/teslafi).
|
|
|
|
Follow this process:
|
|
|
|
1. Copy the CSV data to the `/share/teslamate` folder on your Home Assistant instance.
|
|
You can do this using the [Samba](https://github.com/home-assistant/addons/blob/master/samba/DOCS.md) or [SSH](https://github.com/home-assistant/addons/blob/master/ssh/DOCS.md) addons.
|
|
|
|
2. Make sure the `import_path` configuration setting is set to `/share/teslamate`.
|
|
|
|
3. Restart the TeslaMate addon and navigate to the web UI, you should be presented with the import screen.
|
|
|
|
4. Import the data
|
|
|
|
5. Once imported sucessfully, delete the CSV files to avoid the import screen being presented.
|